A New Venture!

Hello!  Is there anyone still out there reading this!?  I’ve missed you my blog friends!

I know it has been a VERY long time since I blogged here, but I wanted to let you know that I’ve started something new and I think even a little better than Dinner Daydreams.  Over the past few years Mehmet and I have learned a great deal of website development, marketing and user experience.  We’ve combined our knowledge to start a new food blog that we built together.  Please come visit us at http://www.turkswhoeat.com!

This new site is a mix of recipes we create and make at home, such as our Gluten Free Chocolate Almond Butter Cookies,  Thai Chicken Lettuce Wraps and Acai Smoothie Bowl.  As well as sharing some of our favorite food adventures, like our Nashville Eats Round Up.

We hope you’ll check it out!  Please feel free to also follow us by email, Instagram or Facebook!

Swiss Chard and Onion Tart

2014-10-14%2020.54.29

This delicious and filling tart is inspired by Smitten Kitchen’s French Onion Tart. I’ve made her French Onion Tart plenty of times and always enjoy it. This week, I had a bunch of chard I needed to use up and and thought covering it with dough, cheese and onions sounded about perfect!

Unfortunately this isn’t the most photogenic of dishes, but believe me, it still tastes great! I’ll be bringing this over to Angie’s Fiesta Friday party today and boy am I ready for the Fiesta this week!

Onion and Swiss Chard Tart Adapted from Smitten Kitchen’s French Onion Tart

Dough:
2 cups flour
1/4 teaspoon salt
1 teaspoon thyme
1 stick cold butter, cubed
3 tablespoons water

Filling:
1 tablespoon olive oil
1 tablespoon butter
1 large onion, thinly sliced
2 bunches swiss chard, chopped
1/4 teaspoon salt
1 tablespoon white wine (optional)
1 cup chicken stock (any kind of stock will work)
3/4 cup grated parmesan
1 egg
1/2 cup heavy cream

1. Preheat oven to 400 degrees and begin making your dough. In a large bowl combine the flour, salt and thyme. Work the cubed butter into the mixture with your fingers or a pastry cutter. Slowly add the water until you have a solid ball of dough.

2. Roll the dough out to about 1/4 inch thickness and place it over a baking dish.

3. To make the filling and the olive oil and butter to a pan on medium-low heat. Add the onions and cook for about 5 minutes. Add the salt and the swiss chard and continue cooking until the chard has wilted and the onions are translucent. Remove the pan from the heat and add the wine, if using.  Lower the heat and return the pan and add the stock.

2014-10-16%2013.28.46

4. Allow the mixture to simmer until the stock as dissolved. Allow the mixture to cool a bit.

5. In a small bowl combine 1/2 cup of the cheese, the egg and the heavy cream. When the onion and chard mixture has cooled add them on top of the dough and add the egg mixture on top. Fold over any dough that’s off the pan to cover the topping. Sprinkle the remaining cheese on top. Bake at 400 for 35-40 minutes until the dough begins to brown and the cheese is brown and bubbly! Enjoy!

2014-10-16%2013.28.02

2014-10-16%2013.27.20

Butternut Squash, Kale and Apricot Salad

squash3

It’s official, we’ve entered squash season! All kinds of squash are popping up in the grocery stores and my blog feed and Pinterest seems to be overflowing with squash recipes.

Personally, butternut is my favorite of the Fall squashes. I recently heard that it was given it’s name because of it’s buttery softness and taste, I’m not sure if this is true, but it certainly is fitting.

A simple vinaigrette is all this salad needs to top it. I made a quick mixture of olive oil, chili herb vinegar, honey and a tiny bit of chili powder to add just the tiniest kick to offset the sweetness of the squash and the apricots.

Butternut Squash, Kale and Apricot Salad
2 cups roasted butternut squash cubes (see below)
1 bunch baby kale
1 cup dried apricots, chopped into small pieces
1/2 red onion, thinly sliced
4 ounces goat cheese

To make the roasted butternut squash cubes: Preheat oven to 400 degrees. Peel the squash, cut it in half lengthwise and chop into 1 inch cubes. Toss the cubes in a bowl with olive oil and whatever spices you prefer. I like to add salt, pepper, cumin and cinnamon to mine but use whatever flavors you like best. Place the cubes on a baking sheet and bake for 35-45 minutes until they’ve softened.

squash squash2

To prepare the salad just wash and dry the kale, top it with the roasted squash, the apricots, red onion slices and crumble the goat cheese on top. Enjoy!

squash4

Ricotta Gnocchi

photo(12)

I’ve made my love of pasta, especially gnocchi, no secret to all of you.  I often crave the smooth pillowy heavenly bits, but the thought of peeling and boiling potatoes and making a dough just doesn’t seem appealing some days.

I had heard of using ricotta cheese to make gnocchi before, but for some reason I hadn’t given this option a try yet. Every time I heard someone mention making gnocchi with ricotta instead of potatoes they’d say “once you try them this way you’ll never go back” and I have to admit I think they may be right. First of all, it’s so much simpler, less time consuming and they’re super light and soft. I see many more gnocchi in my future now that I’ve discovered these.

I’ve taken such a break from blogging that I’m not even sure if Fiesta Fridays are still happening! I sure hope so because I’ll bring a big batch of these!  Whew, looks like the party is on today!

Ricotta Gnocchi
16 ounces of whole milk ricotta cheese
1/2 cup grated pecorino romano
1 large egg
pinch of salt
3/4 to 1 cup flour

1. Carefully drain any excess liquid from the ricotta. Add the ricotta, pecorino romano, egg and salt to a bowl and combine. Add 3/4 cup of flour and combine. The mix should have some form to it but still be sticky. If it is too sticky continue adding flour a little at a time until you can roll it into a sticky ball.

photo(13)

2. On a lightly floured surface take a small amount of the mixture and roll it into a log about 1/2 inch thick. Cut the logs into about 1/2 inch long gnocchi.

photo(14)

3. Add the gnocchi to a large bowl of boiling salted water. Allow them to cook about 3 minutes then carefully scoop them out. I find it’s best to cook them in 2-3 batches in order to get them all out in time without overcooking.

4. Add your gnocchi to your sauce, I had made a quick tomato cream sauce (recipe to come) but they go great with just about anything. Enjoy!

Cinnamon Caramel Donuts

photo(8)

‘Tis the season..Fall that is! The season of cinnamon, apples, soups and stews is upon us and I have to say it’s one of my favorite times of the year. I willingly embrace the change from sandals to boots, iced tea to warm cider and humidity to a warm blanket.

One change that always signifies the beginning of Fall to me is the opening of the cider mill just outside my hometown. The excitement of waiting in line for a freshly made donut while watching the cider being made has not waned since childhood. Unfortunately, since moving six hours away, I don’t always make it home while they’re open. You can imagine my jealousy this weekend when my best friend back home instagramed a video of those freshly made cinnamon donuts being churned out.

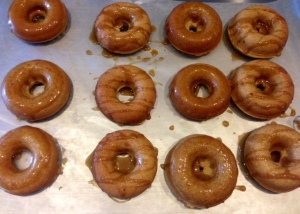
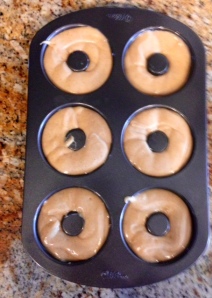
In an attempt to curb my craving (and my jealousy) I set out to make my own donuts. Last year I brought you my Mini Apple Donuts but I think these cinnamon donuts with a caramel topping are even better. Don’t have a donut pan? I impulse bought one like this a few weeks ago and I’m already dreaming up plenty of other ideas for it!

Since I’ve been gone for so long I think I owe it to my amazing fellow bloggers to bring two treats to our Fiesta Friday get together today! Hope they like these!

Cinnamon Caramel Donuts
Makes about 12 donuts
Donuts:
2 cups flour
3/4 cup granulated sugar
1/2 cup brown sugar
2 teaspoons baking powder
1 teaspoon cinnamon
1/2 teaspoon salt
1 egg
2 tablespoons melted butter
1 cup milk
1 teaspoon vanilla extract or paste
1/4 cup honey

Caramel Topping:

1/2 cup brown sugar
1/4 cup heavy cream
2 tablespoons butter
1 teaspoon vanilla paste or extract
pinch of salt

1. Preheat oven to 350 degrees. Lightly grease your donut pan. Combine the flour, sugars, baking powder, cinnamon and salt in a bowl. In a separate bowl combine the remaining ingredients. Slowly add the wet ingredients to the dry until combined, the mix should resemble a cake batter.

2. Pour about 1/3 of the batter into a piping bag. If you don’t have a piping bag, a zip loc bag with the tip cut off works just as well. Carefully pipe the mixture to fill about 3/4 of the donut pan. Bake at 350 for about 13-15 minutes, until a toothpick inserted in one comes out clean.

photo(11)

3. Allow the donuts to cool a but then carefully remove them from the pan.

photo(10)

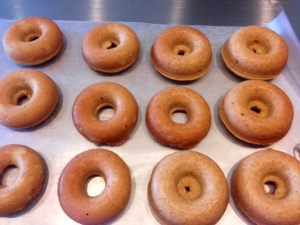
4. To make the caramel add the sugar, cream and butter to a pan on low heat. Whisk the mixture for a a few minutes until the sugar melts and it starts to thicken. Remove from the heat and stir in the vanilla and salt.

5. Allow the caramel to col for a few minutes, then dip the cooled donuts in the caramel or drizzle it over the top, enjoy!

photo(9)

Cornbread Strata and Meet Bindi!

My apologies again for disappearing. I know I said I was back after my last hiatus, but then something very exciting happened….we got a puppy! Meet Bindi our lab mix little cutie.

photo(3)

I absolutely love this little pup, so much so that I find it difficult to spend time cooking or writing instead of playing with her! I think we’ve now gotten into a more routine schedule and I hope to posting much more often. If any of you have suggestions for how you balance blogging with family, work, pets and other priorities I’d love to hear them!!

And now for the food. The mornings have started to get a bit cooler, which makes me want to just curl up with something warm and cozy for breakfast. I had 3/4 of a loaf of cornbread and some sauteed onions left over from earlier in the week and decided to try a strata to use it up. You can really make this with any type of bread, but cornbread gives it a nice fall feel. I like to add a little
King Arthur Vermont Cheese Powder to my cornbread. I know, I know cheese powder? But this is a great ingredient that can add extra flavor to mannny dishes. Bread that is a day or two old generally works best for this as well.

Cornbread Strata
Cornbread (note: this is half the amount that I make if I’m making the bread to eat, the strata doesn’t require as much unless you’re feeding a crowd)
1/2 cup cornmeal
1/2 cup flour
1/4 cup granulated sugar
1/2 teaspoon salt
1 tablespoon King Arthur Vermont Cheese Powder (optional)
1 teaspoon dried thyme
1 teaspoon dried parsley
1/2 cup milk
1 large egg
4 tablespoons butter, melted

Sauteed Onion:
1 large onion
1 tablespoon olive oil
salt
pepper

Strata:
1 pan cornbread (see above)
4 large eggs
3/4 cup milk
1 tablespoon honey
1/2 cup grated cheddar cheese
1/2 cup grated Parmesan cheese

Make the cornbread: Preheat oven to 350 degrees. Combine the cornmeal, flour, sugar, salt, cheese powder, thyme and parsley in a large mixing bowl. Combine the remaining ingredients in a separate bowl. Slowly add the wet ingredients to the dry and stir to combine. Pour the mixture into a baking dish and bake at 350 for 30-40 minutes, until the edges start to brown and a toothpick inserted in the middle comes out clean.

Saute the onions: Add the olive oil to a pan on medium-low heat. Slice the onion thinly and add to the pan. Cook the onions slowly for about 10 minutes until they’re soft and start to brown just a little. Salt and pepper to taste. Let the onions cool.

Make the strata: Cut the cornbread into small chunks and place about 1/2 in the bottom of a baking dish. Combine the rest of the strata ingredients and the cooled onions in a bowl and whisk lightly. Pour half of the mixture over the bread. Place the rest of the bread in the dish and pour the remaining mixture evenly over the bread the cover it. Add some more grated cheese on top if you like. Bake at 350 for about 35-40 minutes until the eggs are cooked. Enjoy!

photo(5)

photo(4)

photo(6)

photo(7)

Ina’s Eggplant Dip

photo(1)

Each Summer I look forward to getting fresh eggplant to make this spread. As soon as I see some beautiful looking eggplants at the market I’m reminded of how delicious this dip is and immediately get excited to make it!

This recipe is not my own, though I usually make a few changes. I have to give credit to the lovely Ina Garten and her amazing ability to make simple ingredients so special and elegant.

I edited Ina’s recipe slightly to add a jalapeno for a bit of spice and some cumin and parsley. This dip is great with some freshly made pita chips, slathered over bread or honestly just by the spoonful! I’ll be sharing this with my friends over at Fiesta Friday today. If you haven’t joined us yet you should definitely stop by!

Ina’s Eggplant Spread from Ina Garten with a few changes

1 eggplant
1 red pepper
1 onion
1 jalapeno
1 garlic clove
3 tablespoons olive oil
1 teaspoon cumin
1 teaspoon salt
1/2 teaspoon black pepper
1/4 cup fresh parsley, chopped
1 tablespoon tomato paste

1. Preheat oven to 400 degrees.

2. Cut the eggplant, red pepper onion and jalapeno into small chunks and place in a bowl with the garlic. Add the olive oil, cumin, salt and pepper to the bowl and toss it all together to coat the vegetables.

3. Place the vegetables on a baking sheet and bake for 35-45 minutes until soften and browned. Remove the baked vegetables and let them cool down.
photo

4. Place the cooled vegetables in a food processor with the parsley and tomato paste and pulse until combined and smooth. Enjoy!

Stuffed Zucchini Flowers

photo

Hey all! I’m happy to say that after a move and a couple of trips I’m finally back, set up in my new kitchen and ready to begin sharing recipes and stories with you all once again!

There are a few foods that always draw me in. Whether it’s their taste, their delicacy or their appearance, I definitely have a list of foods I can’t pass up. Zucchini flowers are a great example of this. They are so delicate and beautiful, yet somehow manage to be crispy on the outside, soft inside and all around delicious.

When I saw zucchini flowers at the farmer’s market last week, I just couldn’t leave without them. I’ve never made them myself before, but I figured with some cheese and breadcrumb I couldn’t go wrong.

photo(3)

Stuffed Zucchini Flowers
6-8 zucchini flowers
3 slices of bread or 1 cup breadcrumbs
4 oz mozzarella cheese
1/2 onion
1 clove garlic
1/2 jalapeno (optional)
1/2 teaspoon salt
1/4 teaspoon black pepper
1 egg lightly beaten

1. Preheat oven to 350 degrees. Carefully open the flower and remove the stamen (long stem) from the inside.

2. Cut your slices of bread into small chunks and place it in a food processor, pulse until you have breadcrumb sized chunks (if you are using breadcrumb just skip this step).

photo(4)

3. Separate the breadcrumb into two bowls, one will be for the stuffing and one will be for the breading.

4. Place the onion, garlic,jalapeno and cheese in the food processor and pulse until it becomes a mixture. Stir the mixture into the bowl with the bread crumb. Carefully spoon the mixture into each flower.

photo(2)

5. Lightly beat the egg in a shallow bowl. Dip each flower into the bowl so the entire thing is covered. Then dip it into the other bowl of just breadcrumb. Place the breaded flowers on a baking sheet and bake at 350 for 20-25 minutes, until the breading starts to brown. Enjoy!

photo(1)


Blog Tour!

Hello!! I’d like to apologize to all of you for my brief blogging hiatus (that may continue for another week or so after this post)! I had to do some traveling for work, and we’re moving this weekend so my apartment is in all sorts of pre-moving disarray. When we’re all set up in our new place and I can find my pans and dishes again I promise there will be plenty of great posts coming your way.

In the meantime, I’d like to say a much overdue thank you to my friend Anita at Kitchen Getaway for featuring me in her blog tour. Anita is always posting mouthwatering recipes, and she even raises her own chickens!! I’m super impressed with her and honored that she chose to include me in her tour. I’m finally catching up and posting my blog tour. I’m also incredibly excited to be joining the party at Fiesta Friday again today – I’ve certainly missed this group!

What am I working on? Well, packing and preparing to move has consumed most of time lately but I have a goal to master macaroons, or at least make some that are pretty enough to photograph. After seeing them pop up all over the place lately I made a batch, and they were good, but not quite right. So I’ll definitely be making a second attempt at those soon.

How does my work differ from others of its genre? This is a tough one. I tend not to focus on being different but on sharing what speaks to me and what I enjoy. I haven’t met much food that I don’t like, and I’m willing to try to re-create just about anything (with varying degrees of success). I’m kind of an eclectic mix of traditional family recipes and figuring out how to work new ingredients I discover into things I’m already familiar with.

How does my writing process work? Well I keep a running list of recipes I want to try or create and then write about, but I find that most of what I end up posting is more of just our day to day food. If I make something for dinner and it turns out especially good, I’ll probably make it again the next night so I take pictures of it!

My Featured Blogs
As part of passing on the blog tour traditions I’ve selected three blogs to feature that I highly encourage you to check out!

Mezze and Dolce
The first time I stumbled upon this blog I couldn’t stop going through the recipes. The name says it all, Mezze (savory) and Dolce (sweet) always make a great combination! They’re always posting very intriguing recipes, take theseZa’atar Buttermilk Biscuits for instance. Or, if you’re looking for something sweet, these Rose-Scented Almond Cookies are beautiful and special.

Bourbon and Brown Sugar
MB is always pushing the limits with her creative concoctions. I’m constantly impressed with her vast food knowledge and compelling story telling. Her Tiny Alfajores are a perfect example of this. She always has a great story to go along with her recipes and can make anything from empanadas to beef bourguignon!

I’ll Cook You Wash
What first caught my eye about Indira’s blog was her title – sounds like the plan in my house! I’m always happy to make dinner, but not so keen on cleaning up after. She can also make a dessert out of avocados – yes avocados! Check out her Avocado cream pie and tell me you’re not impressed!

Pasta Puttanesca

photo(4)Here you go, another pasta recipe! I hope you’re not getting sick of these yet. Leave it to me to make be making all these pastas in the summer while everyone else is gearing up for warm weather and swim suit season. Oh well, that’s who I am.

This week I bring you pasta puttanesca, politely translated to the “working girl’s pasta.” Traditional puttanesca has capers and anchovies, but per usual I didn’t have all the right ingredients in my kitchen so I doubled up on the olives to make up for it. Since the olives are pretty salty I don’t add much salt to the sauce, but feel free to adjust that to your tastes.

Pasta Puttanesca

1 Tablespoon olive oil
1 onion, cut into thin slices
14 oz crushed tomatoes
1/2 teaspoon salt
1 teaspoon red pepper flakes
1 1/2 cups pitted kalamata olives
3 cloves garlic
1 lb spaghetti or bucatini
1 cup cherry tomatoes, halved
4 fresh basil leaves
grated cheese for topping

1. Place the olive oil and onions in a pan on low heat. Cook until the onions are soft and translucent, about 7-8 minutes.

2. Add the crushed tomatoes, red pepper flakes and salt to the pan with the onions and stir to combine. Continue cooking on low heat, stirring often until the sauce starts to bubble.

3. Combine the olives and garlic in a food processor and pulse for just a few seconds until they’re chopped but not too small. Add the olives and garlic to the sauce and cook for about 20 minutes, stirring often.

4. While the sauce is cooking, cook and drain your pasta in a bowl of salted water.

5. Once the sauce is done, turn off the heat and add the cherry tomatoes. Then add the pasta and toss. Finish with chopped basil and cheese and enjoy!